
eSIM Friends & Family
🤫 Page réservée aux amis et à la famille, à prix coûtant majoré — merci de garder le lien pour vous.
1. Choisissez le pays
Aucun pays trouvé — vérifiez l'orthographe ou demandez-moi directement.
2. Choisissez le volume · 30 jours · 4G/5G
Combien de Go pour votre voyage ?
Repère simple : comptez environ 1 Go par jour (cartes, messagerie, réseaux sociaux, un peu de vidéo). Le Wi-Fi de l'hôtel ne consomme rien. Dans le doute, prenez la taille au-dessus — l'écart est de quelques euros.


 🔒 Paiement sécurisé
Never used an eSIM? It's really simple
An eSIM is a 100% digital SIM card: nothing to insert into your phone, nothing to return when you get back. Here's how it works.
Choose your plan
Choose the country you're travelling to and a data volume (10, 20 or 50 GB). Pay in 30 seconds, without creating an account.

Scan the QR code from your email
Your eSIM arrives 2 minutes after purchase. We guide you step by step, screenshot by screenshot.
 PlanJapanYour eSIM is ready 🎌
2 min ago
PlanJapanYour eSIM is ready 🎌
2 min ago

Enjoy from the moment you land
On the day, turn on data roaming (2 settings, shown in the guide below): the internet works as soon as you land. Your usual SIM card stays in place — you keep your number.
Thailand 10 GB7.4 / 10 GB remaining
● Active
Japan 20 GB17 / 20 GB left
● Active

How to install
your eSIM?
2 minutes, no more. Install your eSIM calmly on Wi-Fi before you leave — it will only activate once you arrive at your destination. Follow the step-by-step guide.

Install the eSIM on your iPhone
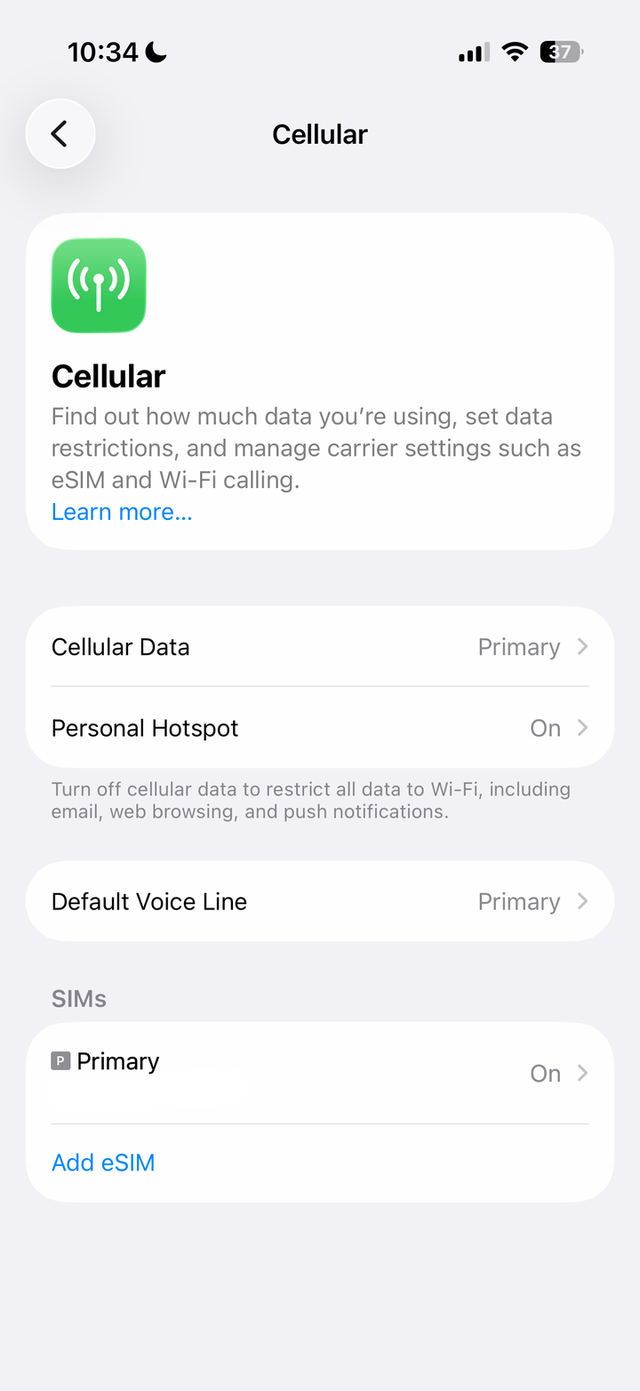
Go to Settings → Cellular (or “Mobile Data”), then tap “Add Cellular Plan” or “Add Mobile Data Plan”.
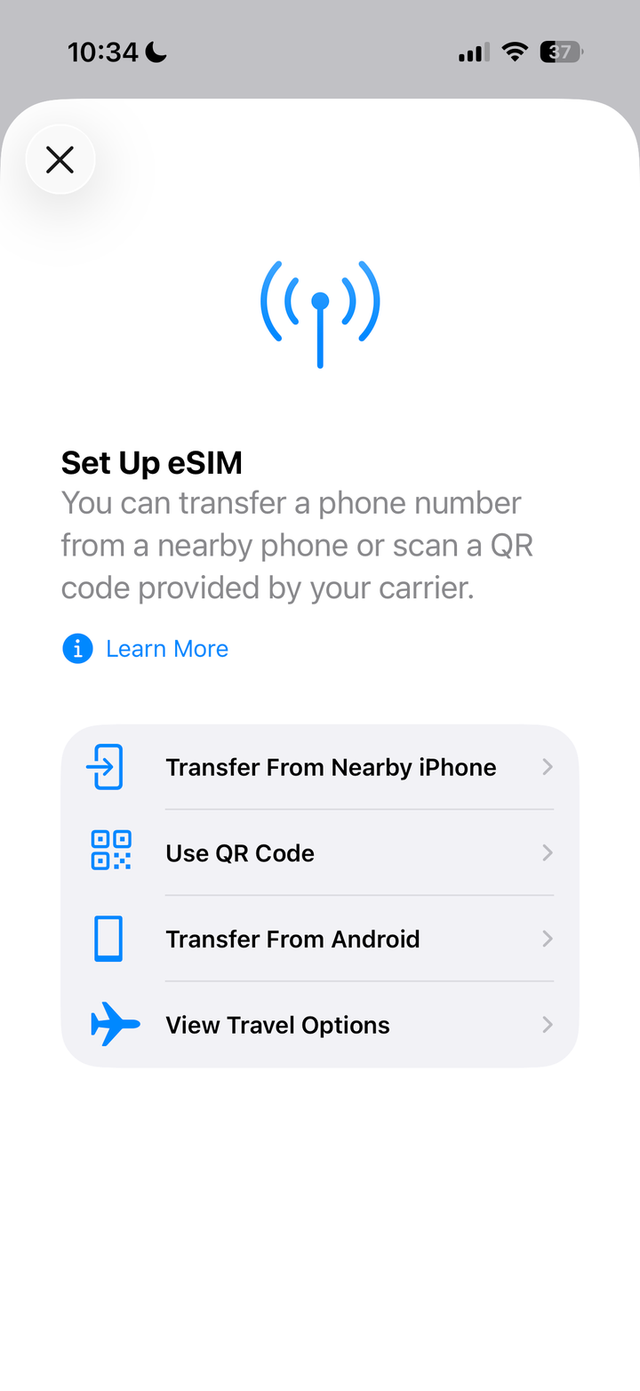
On the “Set Up eSIM” screen, tap Use QR Code.
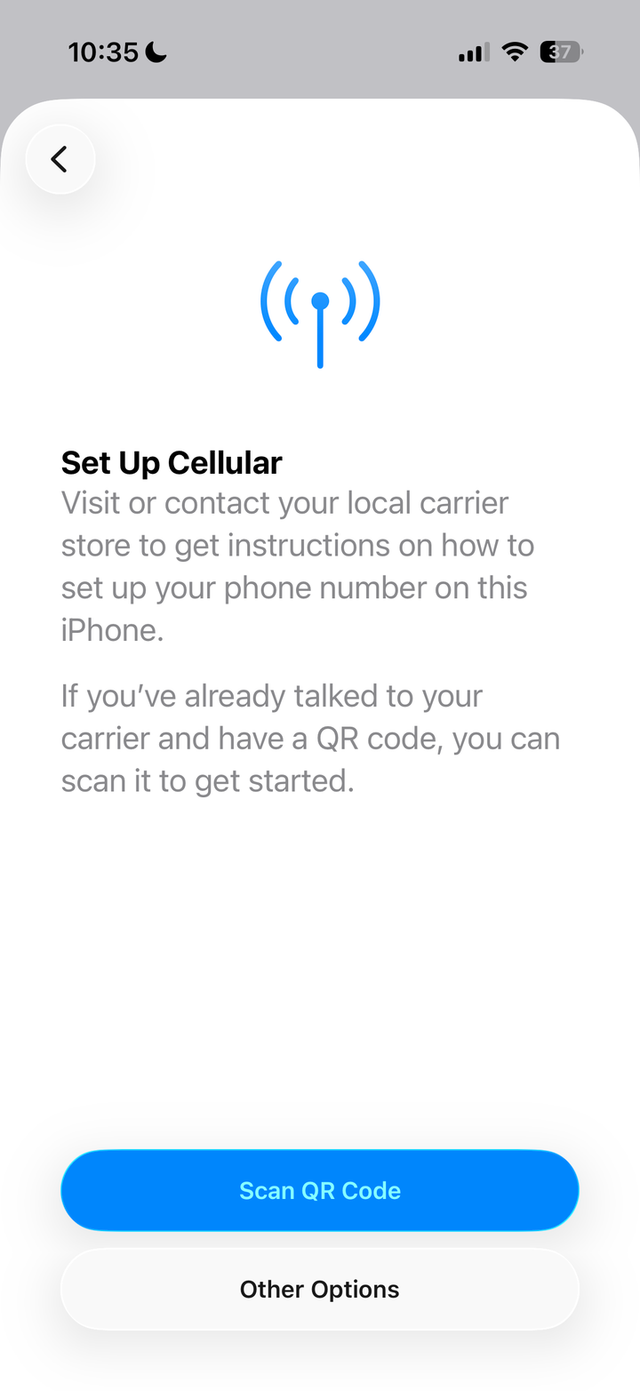
Use your iPhone camera to scan the QR code received by email. You can also save the QR code to your photos and import it from the photo album.
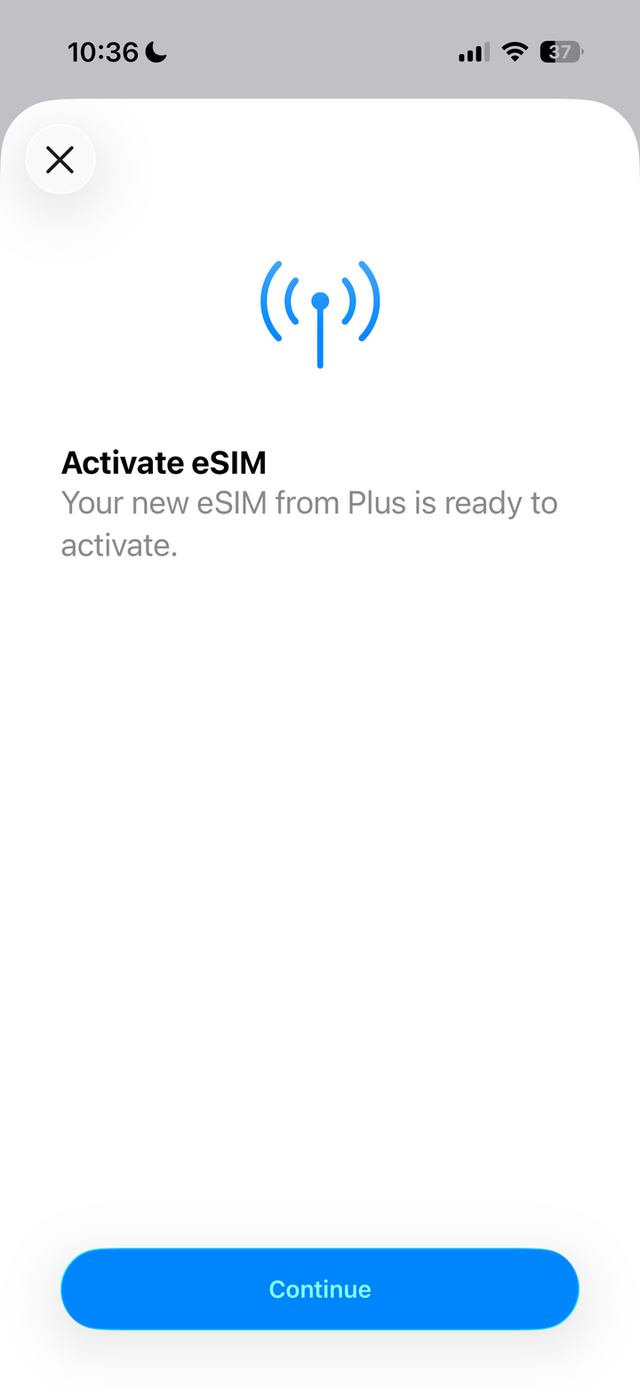
Tap Continue — your iPhone installs the eSIM in a few seconds.
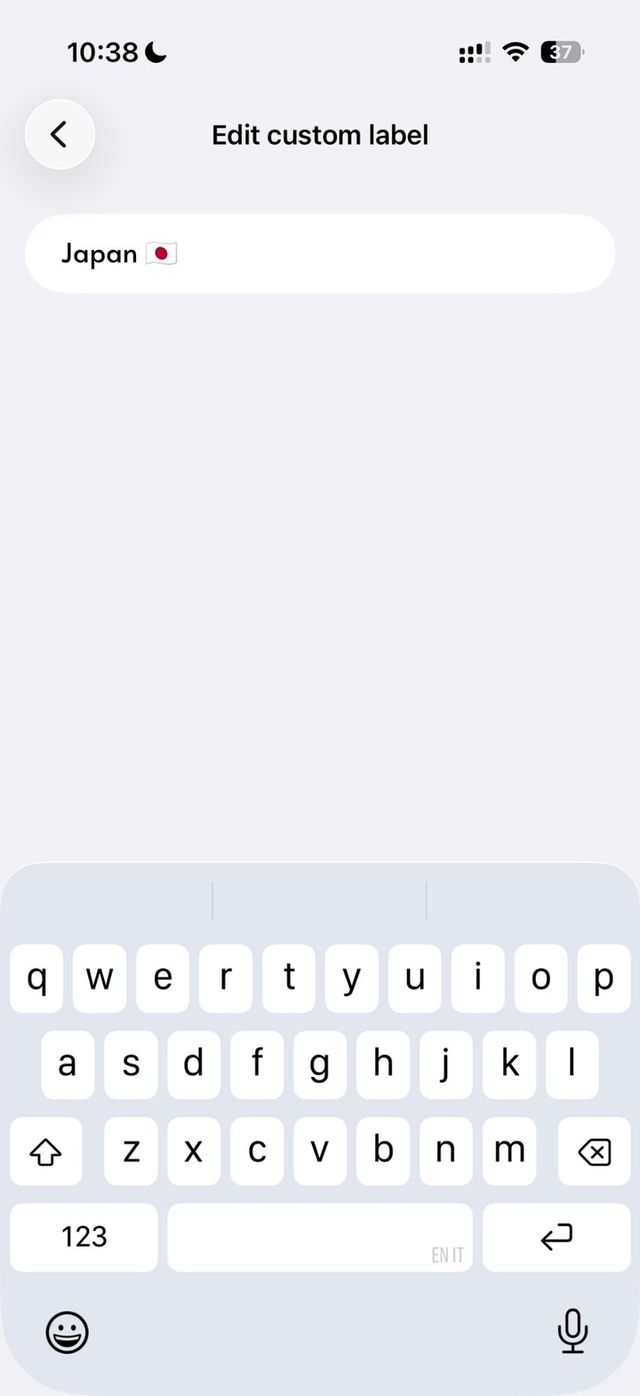
After scanning, give your eSIM a label to find it easily (e.g. “Japan”). Pick a default label or create your own.
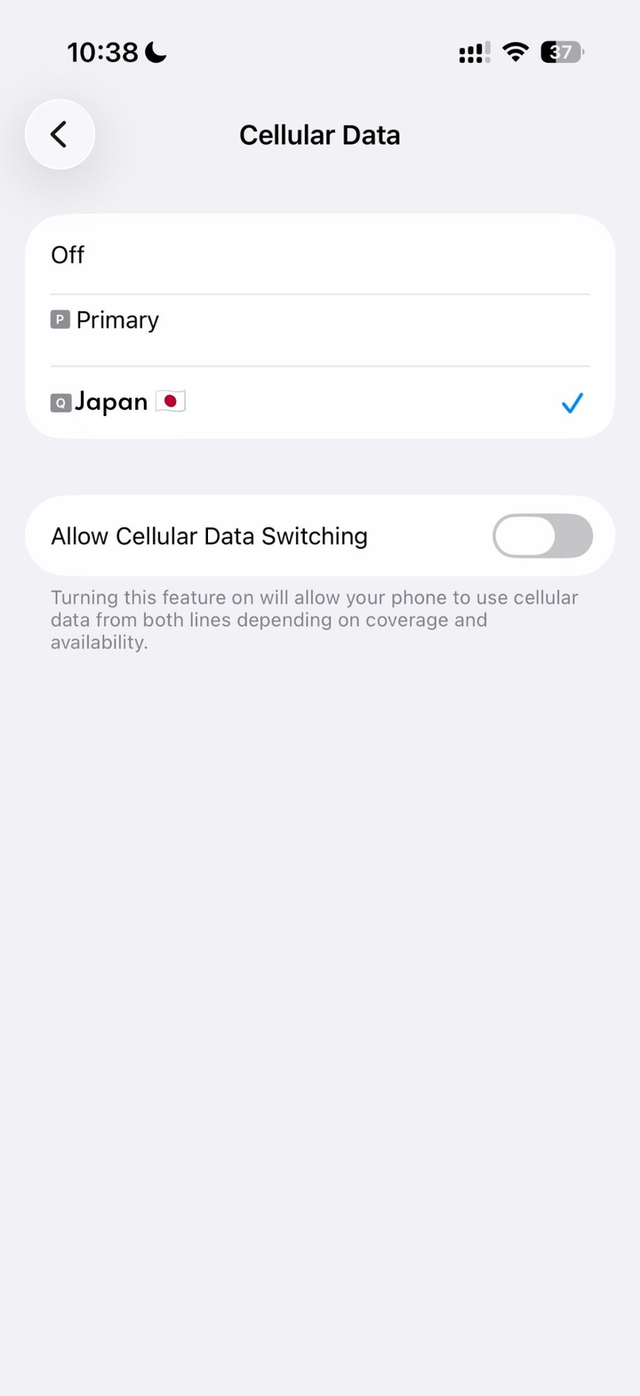
On the “Default Line” page, select your eSIM for cellular data. Your usual SIM keeps calls and SMS — you keep your number and WhatsApp.
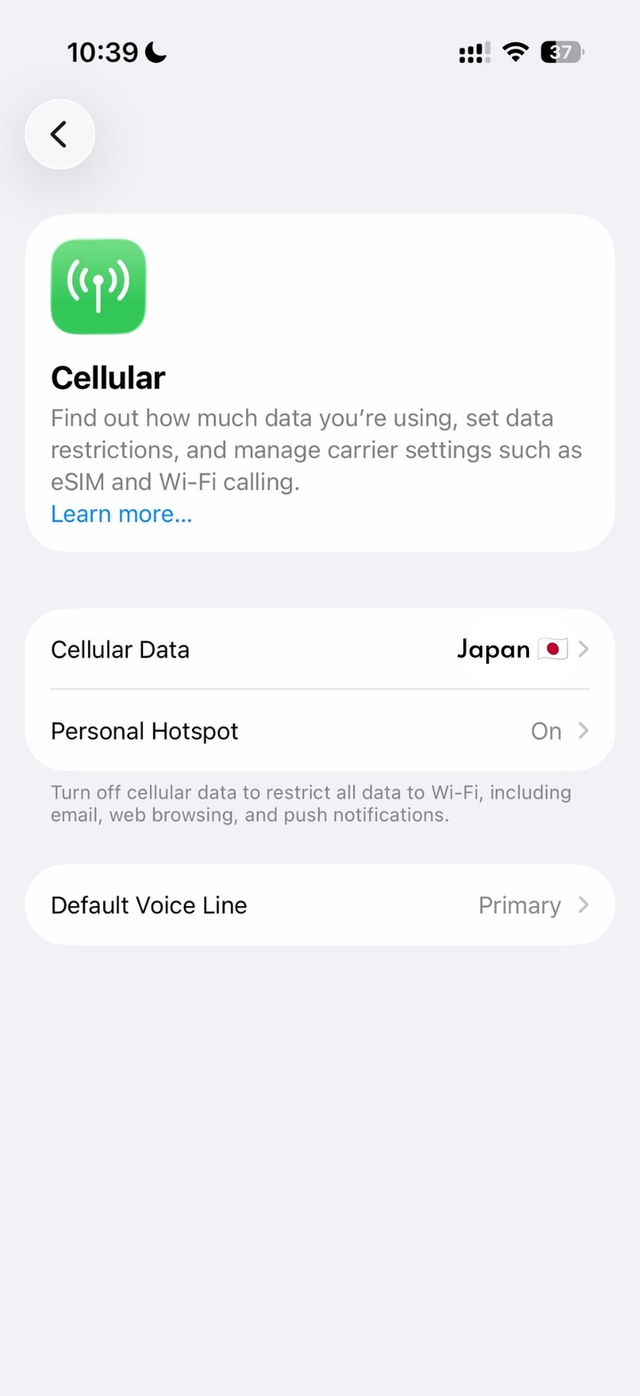
Your new eSIM now appears in your cellular plan settings. It's installed!
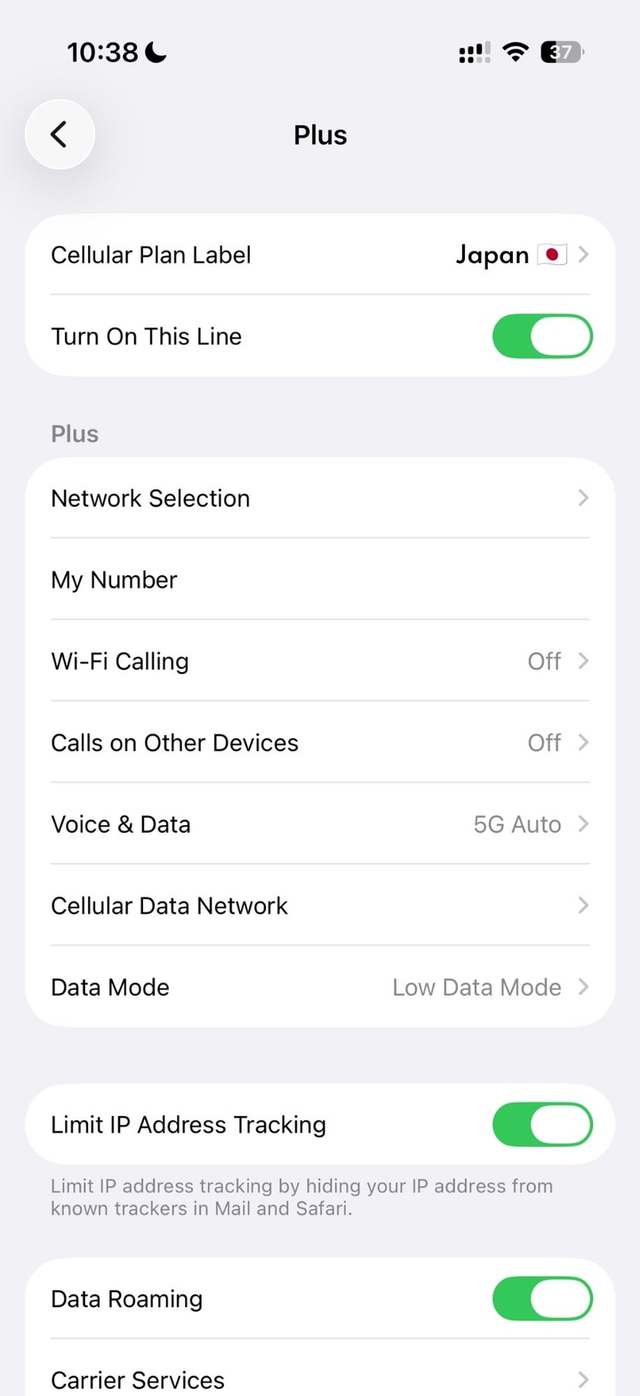
Scroll to “Data Roaming” and turn it on. You'll be connected within seconds.





How to know your eSIM is active?
Install the eSIM on your Android (Samsung, Pixel, Xiaomi…)
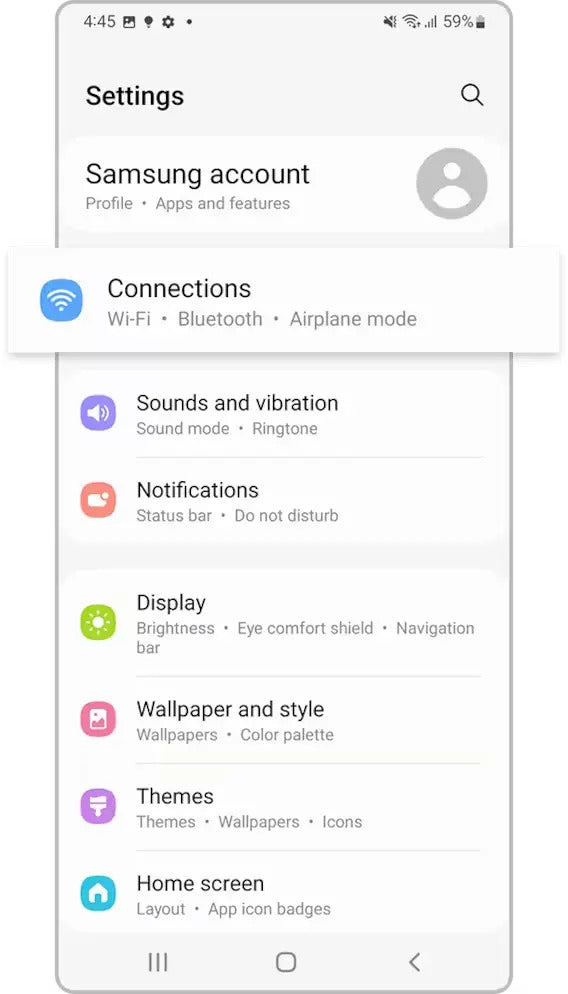
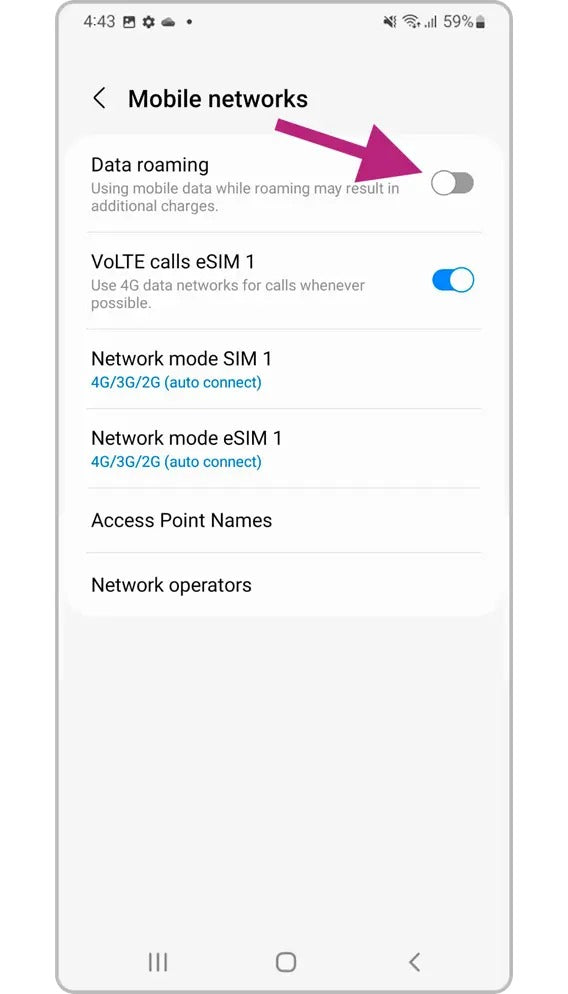
On your Samsung, open Settings and tap Connections.
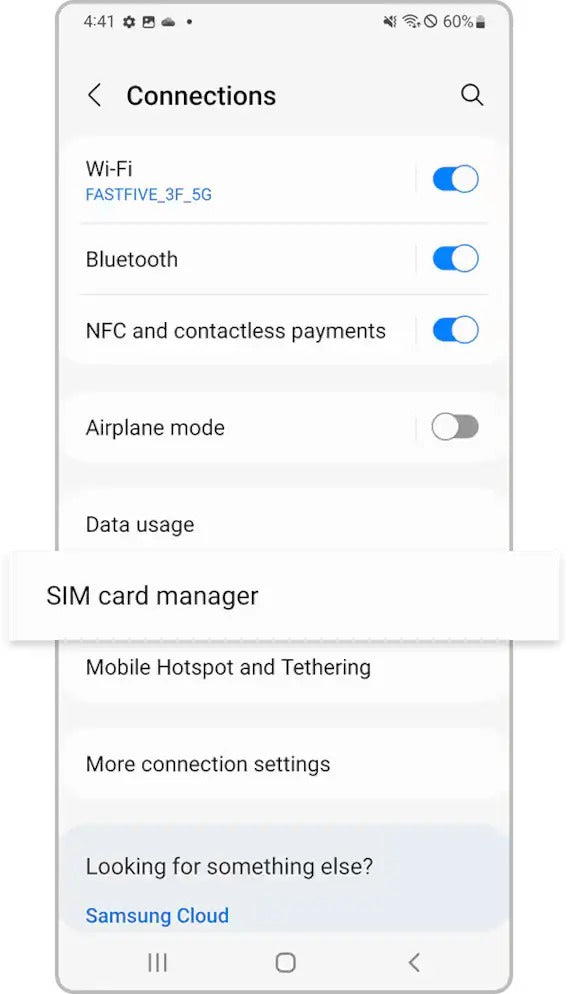
At the bottom of the list, tap SIM card manager.
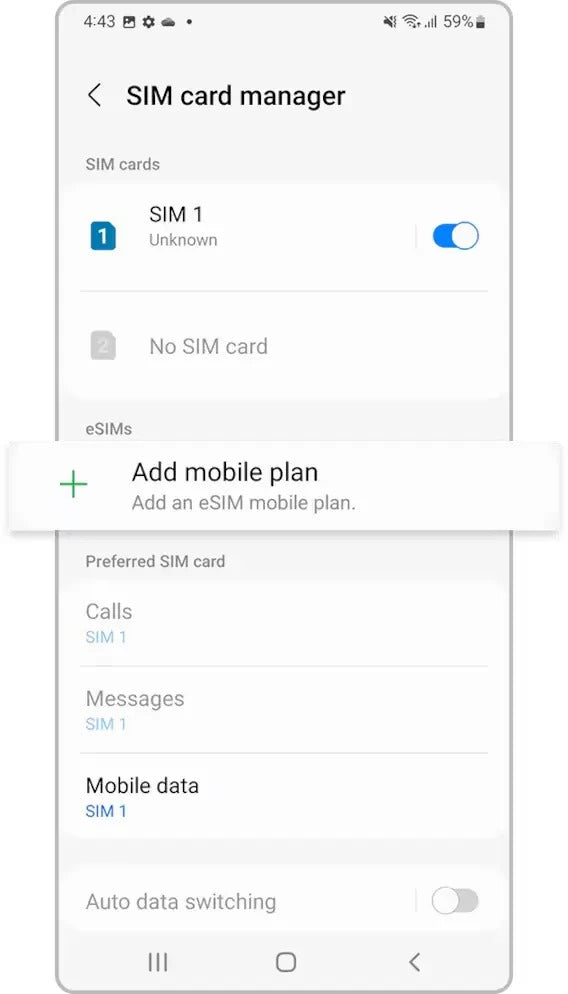
In the eSIMs section, tap Add mobile plan.
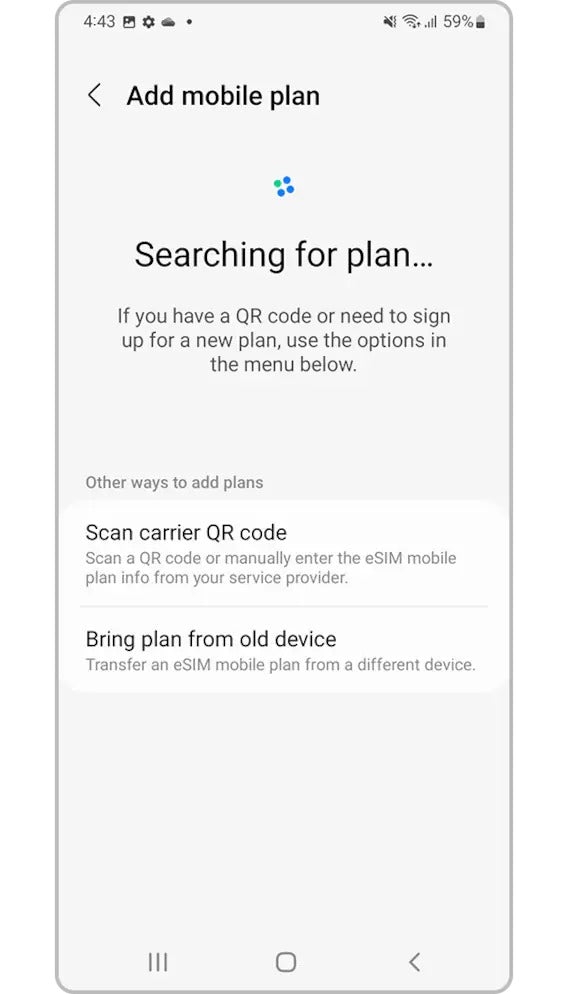
Choose Scan carrier QR code and scan the QR you received by email.
In Mobile networks, enable Data roaming for your eSIM.
How to know your eSIM is active?
Install the eSIM on your Android (Samsung, Pixel, Xiaomi…)
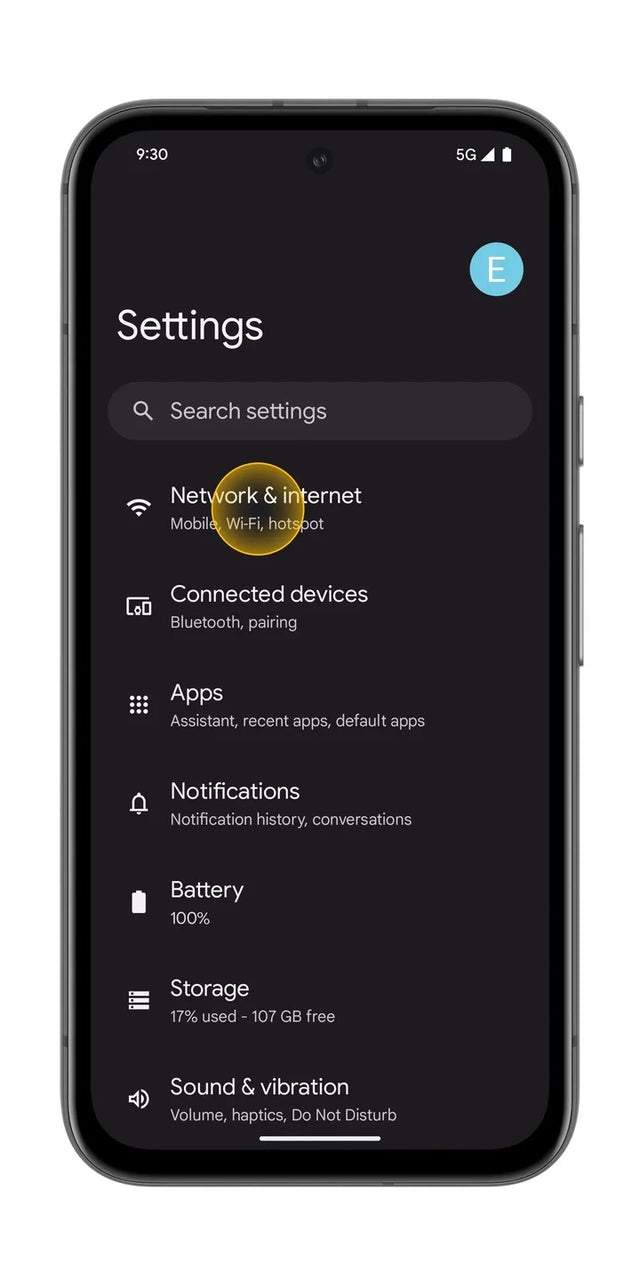
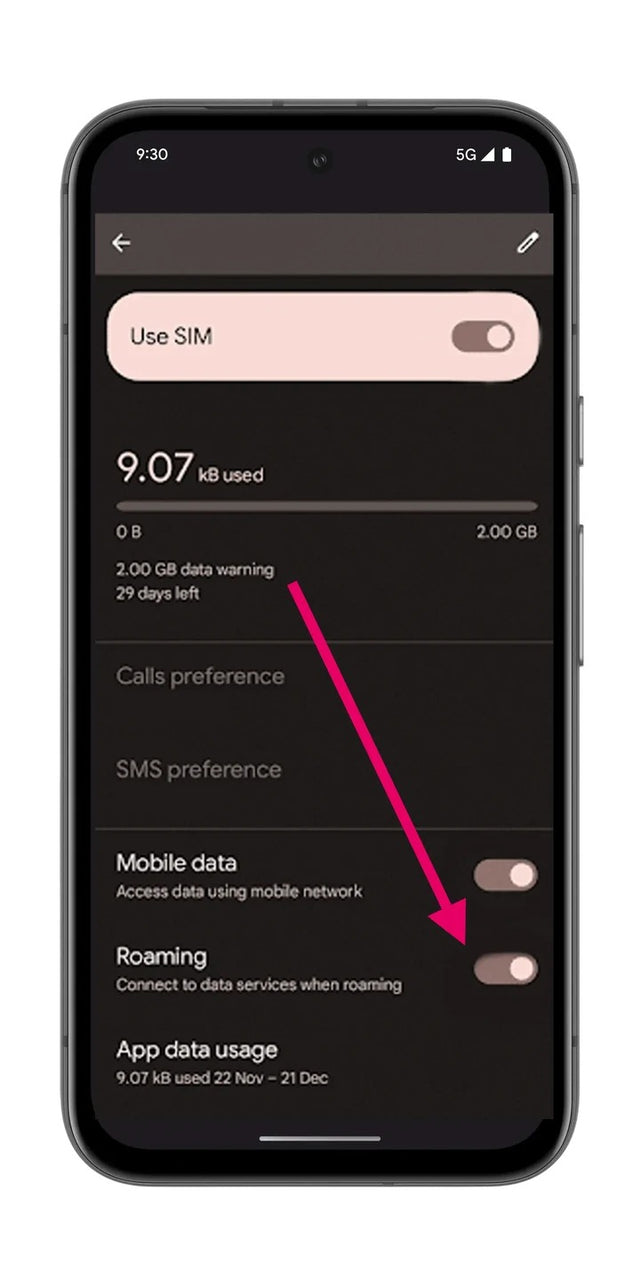
On your Pixel, open Settings then Network & internet.
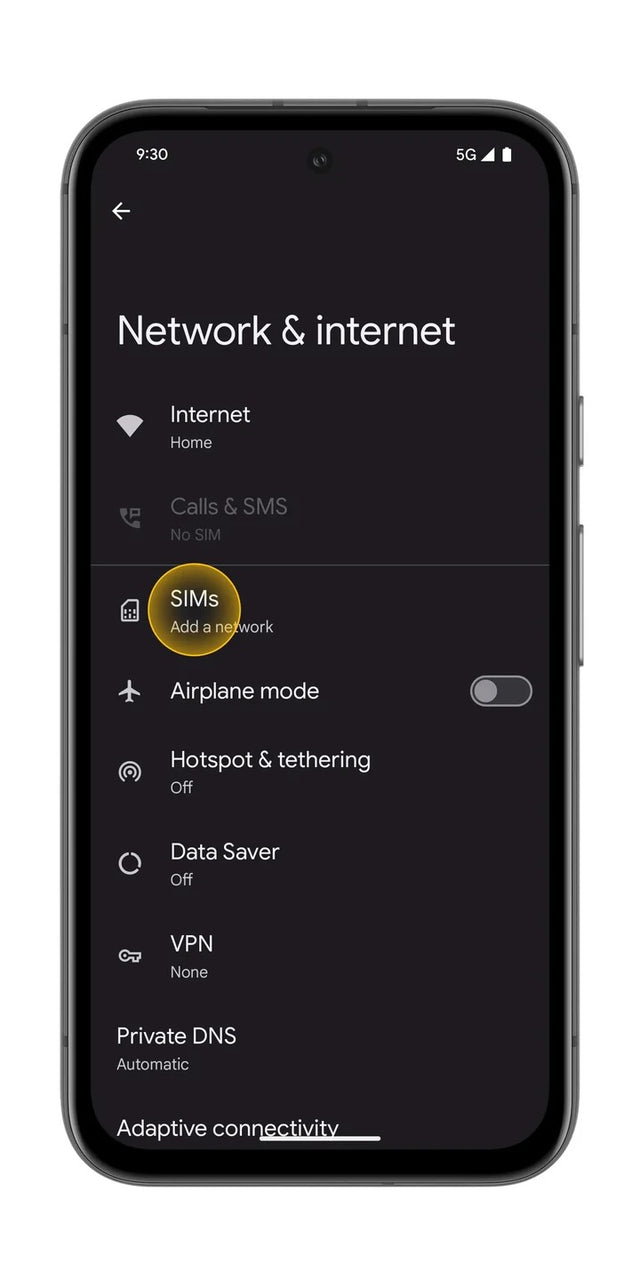
Tap SIMs (Add a network).
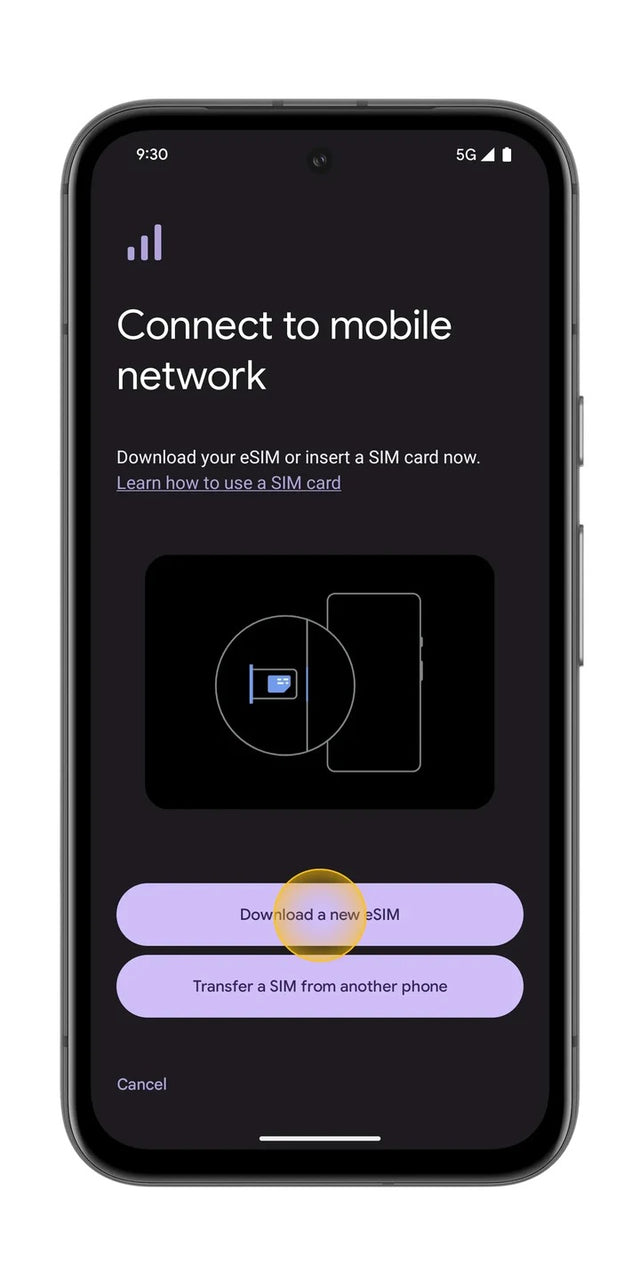
Tap Download a new eSIM, then scan the QR you received by email.
On your eSIM, enable Mobile data and Roaming.
How to know your eSIM is active?
Install the eSIM on your Android (Samsung, Pixel, Xiaomi…)
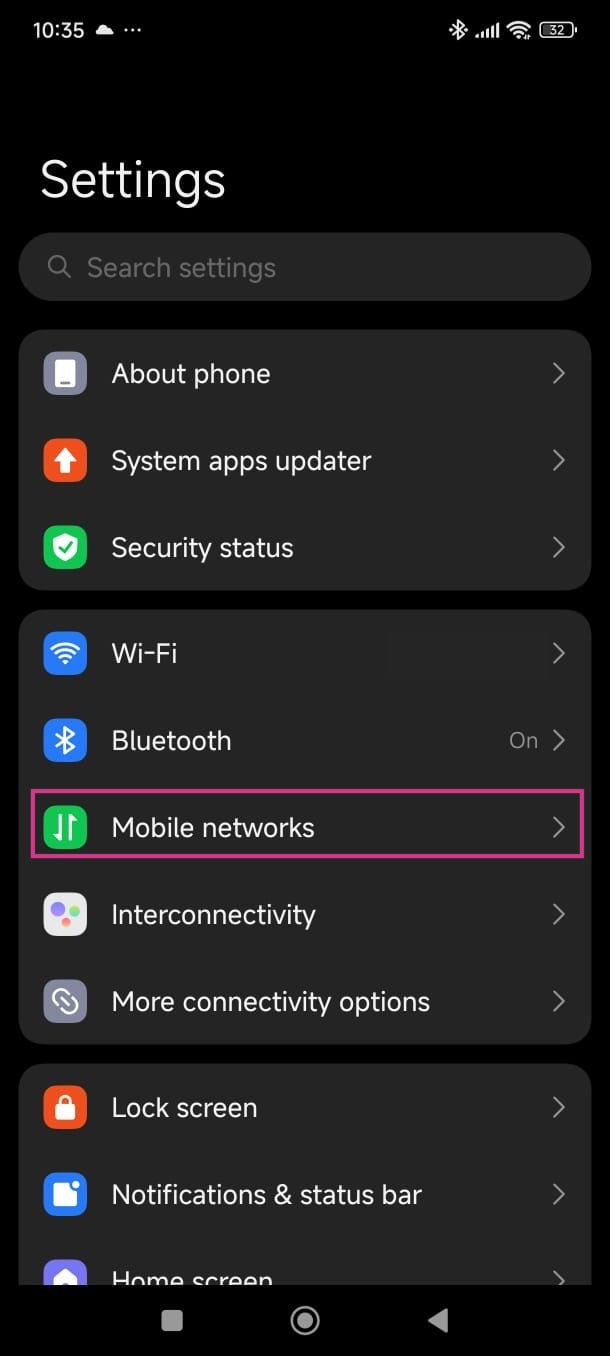
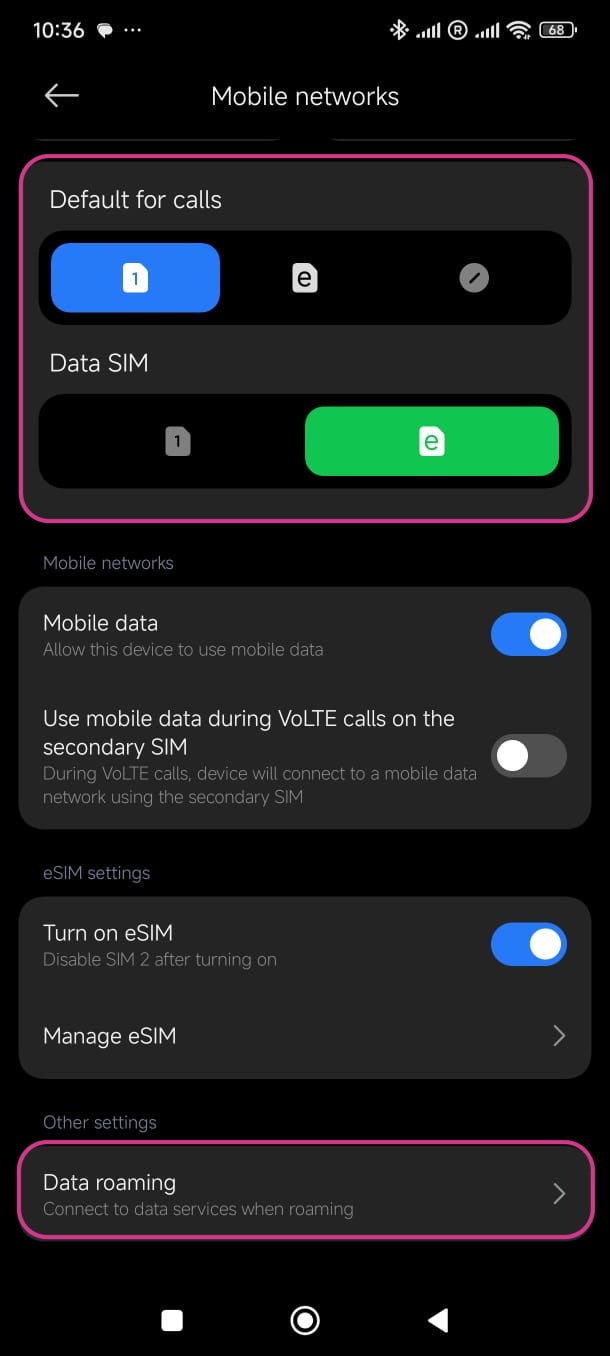
On your Xiaomi or Redmi, open Settings then Mobile networks.
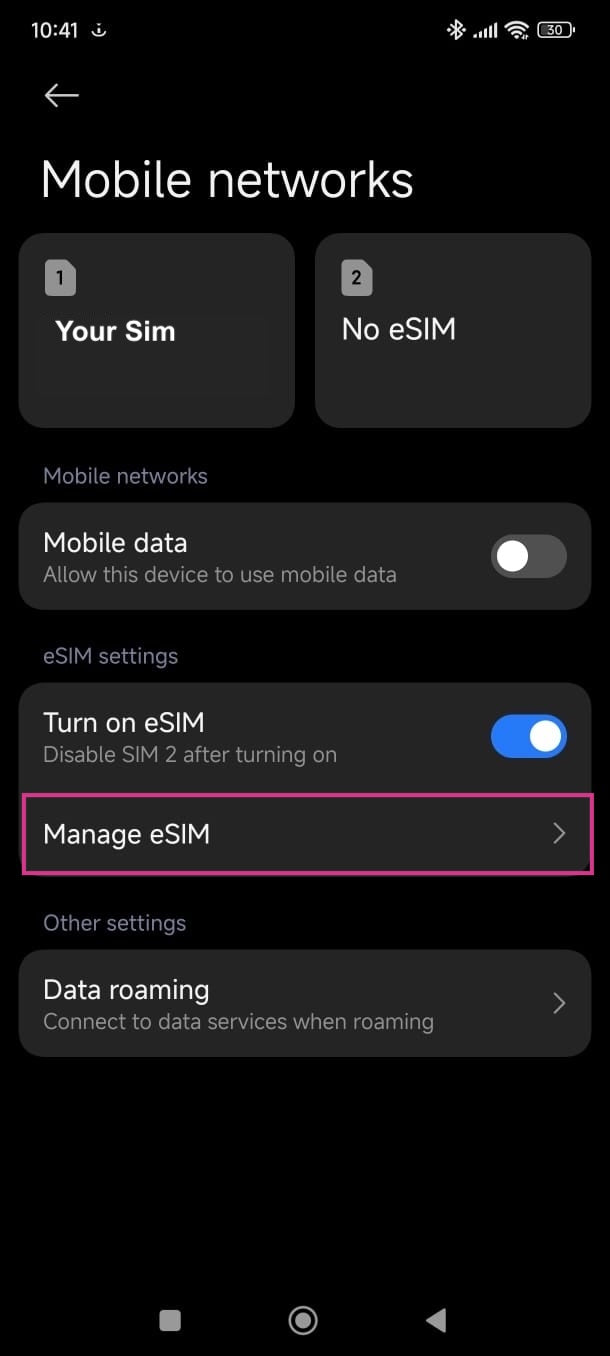
Enable Turn on eSIM if needed, then tap Manage eSIM.
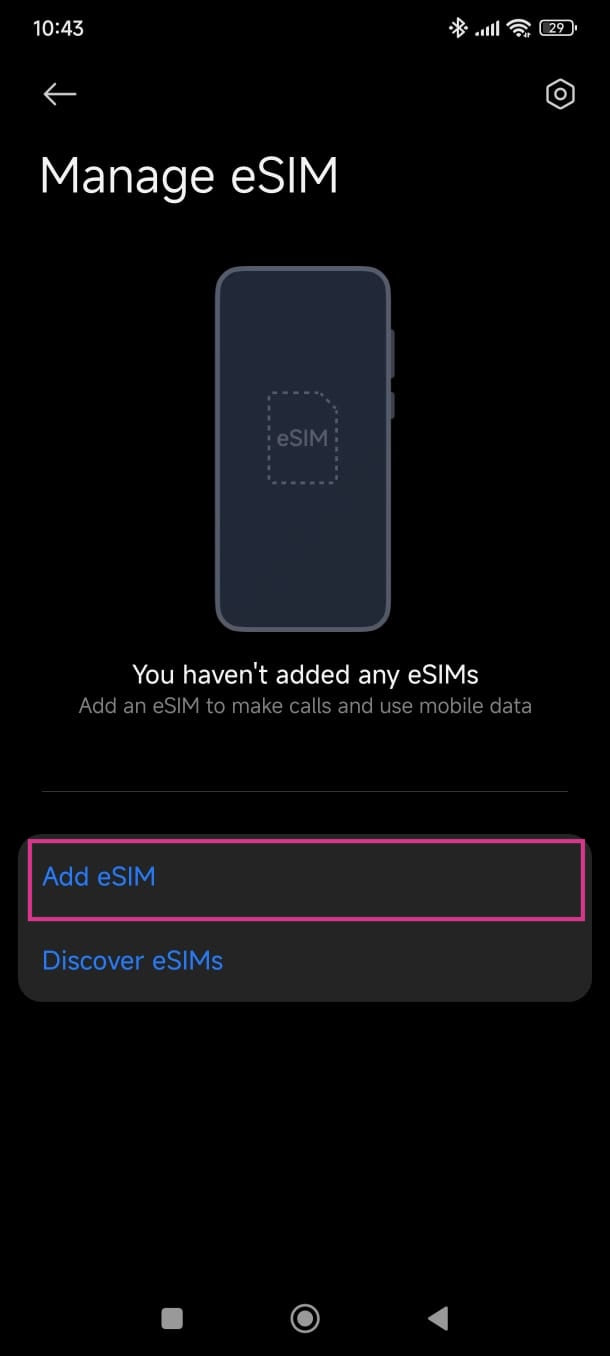
Tap Add eSIM and scan the QR you received by email.
Set the eSIM as your Data SIM, then enable Data roaming.
How to know your eSIM is active?
Install the eSIM on your Android (Samsung, Pixel, Xiaomi…)
Depending on your brand (OnePlus, Oppo, Motorola…), open Settings → Connections or Network & internet.
Tap SIM card manager (or “SIM cards & mobile networks”).
Tap Add mobile plan or “Add eSIM”.
Choose Scan QR code and scan the QR you received by email.
In your eSIM's network settings, enable Data roaming.
How to know your eSIM is active?
 Best practice: install before you leave, on Wi-Fi
Your plan's period only starts when you arrive at your destination. Also keep a copy of the QR code, printed or on another device.
 Need help? We're here, 7 days a week.
Our support team replies within minutes on WhatsApp and by email — 7 days a week, weekends included.
💬 Contact usIs your phone compatible?
Check in 10 seconds — and if your phone turns out not to be compatible, we refund you in full.
The questions I get asked most
A 100% digital SIM card. Nothing to insert into your phone: you scan a QR code and a second line is added, dedicated to the internet for your trip. Nothing to return when you get back.
No. Your usual SIM card stays in your phone and your number doesn't change. WhatsApp keeps working as normal, with your current number.
Most recent phones are (iPhone XR and later, Samsung Galaxy S20 and later, Google Pixel…). Check yours in 10 seconds in the list of compatible devices.
Buy whenever you like. Install the eSIM the day before you leave, calmly on Wi-Fi (guide above). The plan's 30 days only start on your first connection over there.
You turn your phone back on, you turn on data roaming on the eSIM line (2 settings, shown in the guide) and the internet works. Give it 1 to 2 minutes.
Never delete the eSIM from your phone. Write to me directly — we'll sort it out together in a few minutes, and if your phone turns out to be incompatible, I'll refund you.
Can't find your answer?Our support team replies within minutes on WhatsApp and by email — 7 days a week, weekends included.
💬 Contact us